Creating your own bow drill for starting fires can be an exciting and rewarding experience. In this guide, you’ll learn everything you need to know about crafting a reliable bow drill from scratch. With a few simple tools and materials, you’ll be mastering an ancient fire-starting technique in no time. Get ready to dive into the step-by-step process of assembling your bow, spindle, fireboard, and handhold to create friction and spark a flame. It’s a journey into primitive skills that will not only boost your survival knowledge but also give you a sense of self-sufficiency and accomplishment.
How to Make a Bow Drill for Starting Fires
Have you ever found yourself in the great outdoors without a lighter or matches, wondering how you might start a fire using just what nature provides? Fear not! This comprehensive guide will teach you exactly how to make a bow drill for starting fires. A bow drill is one of the oldest and most reliable fire-starting methods, and learning to make one can be an invaluable skill for any outdoor enthusiast.

Understanding the Bow Drill
Before diving into the steps, it’s important to understand what a bow drill is and how it works. A bow drill uses friction to create heat, which in turn ignites a small piece of material called a “tinder bundle.” Once you have an ember, you can use it to start a larger fire.
Components of the Bow Drill
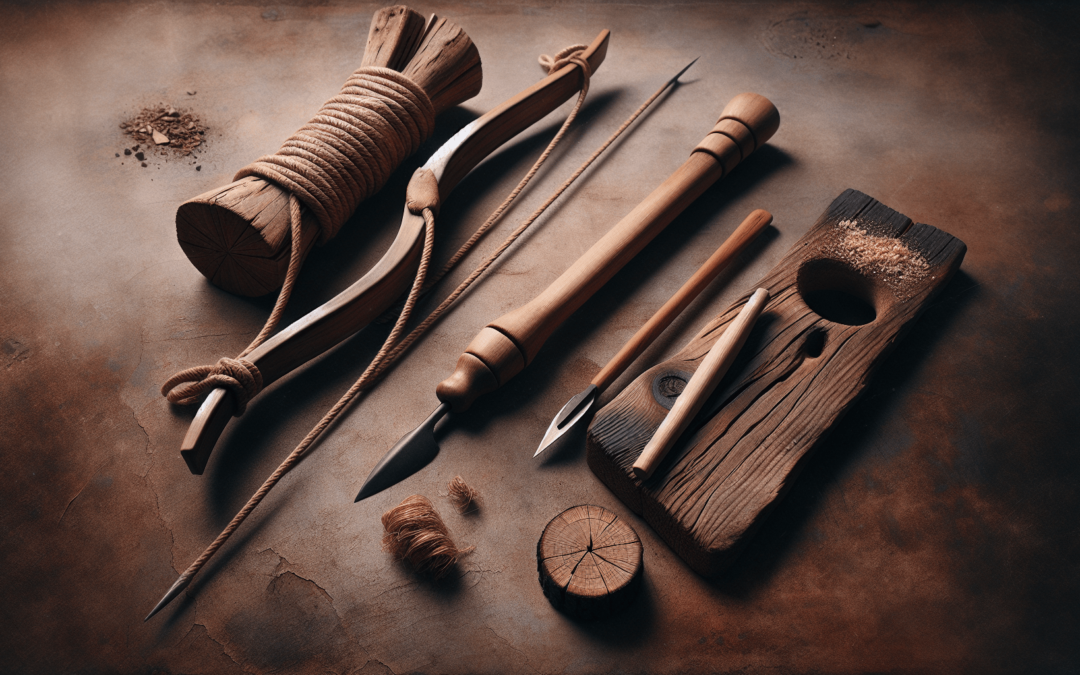
The bow drill consists of several main components:
- Spindle (Drill): A spindle is a straight piece of wood that will rotate and generate friction against the fireboard.
- Bow: The bow is a curved piece of wood with a string attached, used to spin the spindle.
- Fireboard (Hearth Board): This is a flat piece of wood with a notch where the spindle will create heat and embers.
- Handhold (Socket): The handhold is used to press down on the spindle and keep it steady while you operate the bow.
- Tinder Bundle: This is the material that will catch the ember created by the friction and start your fire.
Gathering Materials
To make a bow drill, you will need to gather the right materials. Choosing the right type of wood is crucial for success.
Suitable Wood Types
The key to a successful bow drill setup is using the right types of wood. Not all wood is created equal when it comes to fire-starting friction. Below is a table to help you identify suitable types of wood for each part of your bow drill:
| Component | Recommended Wood Types | Characteristics |
|---|---|---|
| Spindle | Willow, Cedar, Poplar, Magnolia | Light, soft, straight-grained wood |
| Fireboard | Cedar, Pine, Basswood, Cottonwood | Softwood that can produce friction and dust for ember |
| Bow | Any strong, flexible wood | Should be curved, durable, and flexible |
| Handhold | Hardwood like Oak or Maple | Durable, smooth wood that can withstand pressure |
Additional Materials
Apart from wood, you will also need:
- Straight, supple branch for the bow
- Sturdy string (paracord works great)
- Smooth rock or piece of wood for the handhold
- Knife for carving
- Tinder for starting the fire
Now, let’s get to the actual process of making the bow drill.
Step-by-Step Guide to Making a Bow Drill
Step 1: Crafting the Spindle
The spindle, also known as the drill, is essential for creating friction on the fireboard.
- Select a Straight Piece of Wood: Choose a piece of wood that is about ¾ inch in diameter and 12-14 inches long.
- Carve the Spindle: Whittle the wood to be straight and cylindrical. Make one end pointed and the other end blunt. The pointed end will reduce friction with the handhold, while the blunt end will increase friction on the fireboard.
Step 2: Making the Fireboard
The fireboard, or hearth board, is where the friction will create the heat necessary for an ember.
- Select a Softwood: Choose a soft, flat piece of wood about ¾ inch thick and 10-12 inches long.
- Carve a Notch: Carve a small, round depression near the edge of the fireboard where the spindle will sit. Then, carve a V-shaped notch from the edge of the fireboard to the center of the depression. This will collect the hot dust that will form an ember.
Step 3: Constructing the Bow
A good bow will help you rotate the spindle quickly and efficiently.
- Find a Curved Branch: The branch should be about 20 inches long and slightly curved.
- Attach the String: Secure a strong string (paracord is recommended) to each end of the bow. The string should be taut, but not overly tight. You can use knots like the bowline or clove hitch to secure the string.
Step 4: Creating the Handhold
The handhold, or socket, will help you apply downward pressure on the spindle.
- Select a Hardwood: Choose a small, durable piece of wood or rock.
- Carve a Depression: Carve a small depression in the handhold where the pointed end of the spindle can sit. This will reduce friction with the spindle, making it easier to rotate.
Step 5: Assembling the Bow Drill
Now that all the components are ready, it’s time to put them together.
- Thread the Spindle: Place the spindle against the string of the bow and twist the spindle so that the string loops around it once. The spindle should be in the middle of the bow.
- Position the Handhold: Place the pointed end of the spindle into the depression of the handhold.
- Position the Fireboard: Place the blunt end of the spindle into the small, round depression on the fireboard.
Using the Bow Drill
Now that your bow drill is assembled, it’s time to use it to start a fire.
Step 1: Preparing the Tinder Bundle
Before you start drilling, make sure you have a tinder bundle ready.
- Gather Tinder: Collect dry, fibrous material like dry grass, bark shavings, or cotton.
- Form a Bundle: Shape the tinder into a loose, fluffy bundle about the size of a softball. This will catch the ember and ignite.
Step 2: Starting the Fire
With your bow drill assembled and your tinder bundle ready, you can now start drilling for an ember.
- Kneel Down: Place the fireboard on a flat surface. Kneel down on one knee, with the other foot holding the fireboard in place.
- Hold the Spindle and Bow: Grip the spindle with the handhold using one hand, and the bow in the other hand.
- Start Drilling: Begin moving the bow back and forth in a sawing motion. Apply steady downward pressure with the handhold and ensure the spindle rotates smoothly in the fireboard.
- Increase Speed: Gradually increase the speed and pressure as you saw the bow back and forth. You should start to see smoke and fine, black powder collecting in the V-notch of the fireboard.
- Forming the Ember: Once you have enough friction, an ember will form in the powder collected in the notch. Keep drilling until you see a small glowing ember.
Step 3: Igniting the Tinder Bundle
Once you have successfully created an ember, carefully transfer it to the tinder bundle.
- Transfer the Ember: Use a knife or piece of wood to gently transfer the glowing ember from the fireboard notch to the center of the tinder bundle.
- Blow on the Ember: Gently blow on the ember to ignite the tinder. As you blow, the tinder will start to smoke and eventually catch fire.
- Build Your Fire: Once the tinder bundle is burning, carefully transfer it to your prepared fire setup. Add kindling slowly to build a larger fire.

Tips and Tricks for Success
Learning to make and use a bow drill takes practice. Here are some tips and tricks to help you succeed:
- Choose Dry Wood: Always use dry wood for the spindle and fireboard. Moist wood will not create enough friction.
- Maintain Consistent Pressure: Applying consistent downward pressure with the handhold helps create more friction and heat.
- Keep the Spindle Straight: Ensure that the spindle remains vertical while drilling to maximize friction and efficiency.
- Patience is Key: Starting a fire with a bow drill requires patience and practice. Don’t get discouraged if it doesn’t work on your first try.
Troubleshooting Common Issues
Even with the best intentions and preparation, you might encounter some issues. Here are common problems and how to fix them:
Low Friction
Solution: Check that your spindle and fireboard are both dry and made from suitable, soft wood. Ensure the bowstring is tight enough.
Difficulty Keeping Embers
Solution: Use finer, dryer tinder and ensure the notch in your fireboard is correctly placed to catch and hold the hot dust.
Bowstring Slipping
Solution: Re-tighten the string on your bow or use a different type of cord that does not stretch as much.
Hand Pain
Solution: Use a hardwood or rock for the handhold to reduce friction and make it more comfortable to apply pressure.
Advantages and Disadvantages of Using a Bow Drill
Understanding the pros and cons of using a bow drill can help you decide when and where to use this method for starting fires.
Advantages
- Traditional Survival Skill: Knowing how to make and use a bow drill is a valuable survival skill.
- Sustainable: It uses natural materials, making it sustainable and eco-friendly.
- Reliable: When done correctly, a bow drill is a reliable method for creating fire.
Disadvantages
- Time-Consuming: Creating a fire with a bow drill takes more time and effort compared to modern methods like lighters or matches.
- Physical Effort: Requires a fair amount of physical strength and endurance.
- Material Dependent: Success is heavily dependent on the availability of suitable materials.
Alternatives to Bow Drills
While the bow drill is a time-tested method for fire starting, there are also other traditional alternatives worth knowing about:
Hand Drill
A hand drill is similar to a bow drill but uses only your hands to rotate the spindle. This method requires even more physical effort and skill but can be effective in the right conditions.
Fire Plough
A fire plough uses a stick and a groove in a flat piece of wood. You push the stick back and forth in the groove to create friction and generate an ember.
Flint and Steel
Using flint and steel to create sparks is another traditional method for starting fires. This method requires the right materials and some practice to master.
Final Thoughts
Learning how to make a bow drill for starting fires is not just about acquiring a survival skill. It also connects you with ancient traditions and helps you appreciate the ingenuity of past civilizations. With practice, patience, and the right materials, you’ll be able to master this technique and keep the knowledge alive.
So next time you find yourself without modern fire-starting tools in the great outdoors, remember—you can start a fire using just nature’s provisions and your newfound skills. Happy fire-making, and may your adventures always bring you warmth and light!