You’re about to embark on a fascinating journey into the world of DIY water filtration by creating a natural water filter using simple materials like sand and charcoal. This easy and sustainable project not only helps you understand the principles of water purification but also empowers you with the skills to ensure access to clean water in a pinch. By layering these natural elements, you’ll learn how to effectively remove impurities, making your water safe to drink while gaining a deeper appreciation for the science behind filtration. Get ready – it’s time to transform basic supplies into a vital tool for survival and sustainability. Have you ever found yourself in a situation where clean drinking water isn’t readily available? Perhaps you’re on a camping trip, experiencing a survival scenario, or just looking to learn a valuable skill that could be essential one day. Either way, knowing how to make a natural water filter with sand and charcoal can be incredibly useful.
In this friendly guide, you’ll discover step-by-step instructions on how to create your own natural water filter. We’ll cover the materials you’ll need, the process of assembling the filter, and the science behind how it works to ensure you understand every aspect of this invaluable skill.
Why Filtering Water is Important
Clean water is essential for life. Drinking contaminated water can lead to illness, infections, and even parasitic infestations. Understanding how to filter water can help you avoid these potential health issues when you find yourself without a clean water source.
Common Contaminants in Unfiltered Water
It’s important to understand what kinds of contaminants you’re trying to filter out of your water. Here’s a quick look at the usual suspects:
| Contaminant | Source | Potential Effect |
|---|---|---|
| Bacteria | Natural water bodies, animal/human waste | Gastrointestinal issues, infections |
| Viruses | Contaminated surface water | Disease, infections |
| Protozoa | Unfiltered water from natural sources | Parasitic infections |
| Heavy Metals | Industrial runoff, natural deposits | Chronic health conditions |
| Chemicals/pesticides | Agricultural runoff, industrial waste | Toxicity, long-term health effects |
Benefits of a DIY Natural Water Filter
Building your own water filter has several advantages. Not only is it cost-effective, but it’s also an excellent skill to have for emergencies. Plus, knowing exactly how your filter works can give you peace of mind.
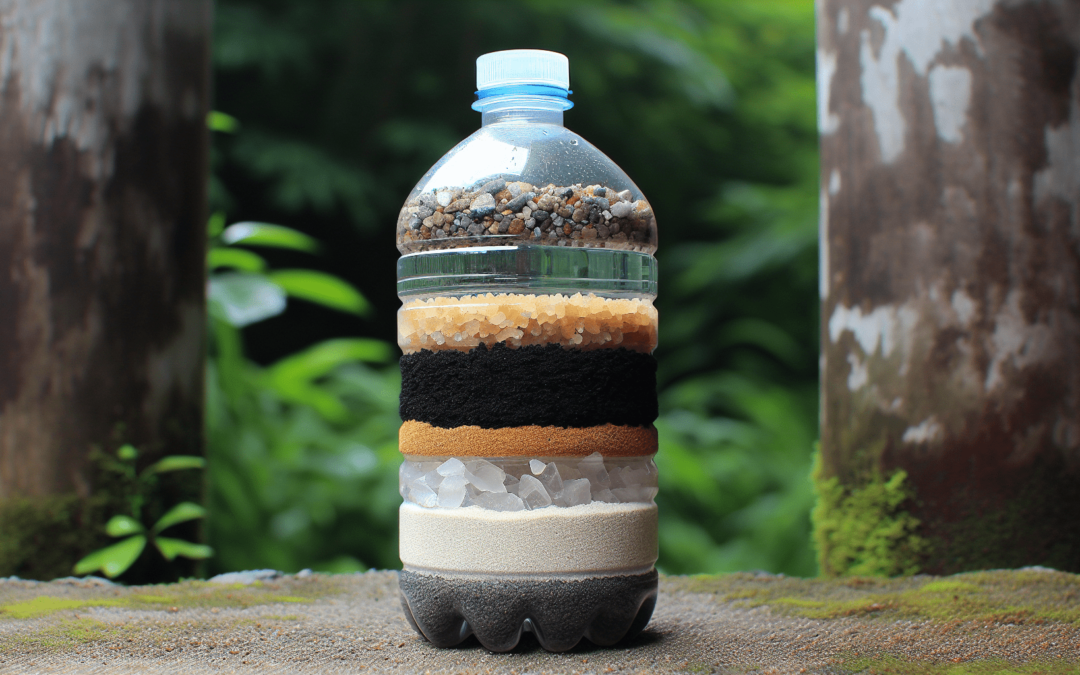
Materials You Will Need
Before you embark on creating your water filter, you need to gather the right materials. Here’s a list of essential items you’ll need to make a basic filter:
- Container: A plastic bottle or any cylindrical container.
- Sand: Fine-grain sand is preferable.
- Charcoal: Activated charcoal works best, but you can use charcoal from a fire if necessary.
- Gravel: Small pebbles or larger gravel.
- Cloth or coffee filter: This will act as the first layer to catch larger debris.
- Rubber bands: To secure the cloth or filter to your container.
- Knife or scissors: For cutting your container and cloth.

Assembling the Filter
Now that you’ve gathered your materials, let’s walk through the steps of assembling your natural water filter.
Step 1: Prepare the Container
First, take your container and cut off the bottom. If you’re using a plastic bottle, make a clean cut around 3-4 inches from the base. The bottle will be turned upside down, so the neck of the bottle will be the bottom of your filter.
Step 2: Secure the First Layer
Attach a piece of cloth or a coffee filter to the neck of the bottle. You can use rubber bands to keep it securely in place. This layer will serve as the initial barrier to catch larger particles.
Step 3: Add the Charcoal Layer
Next, add a layer of crushed charcoal. Activated charcoal is highly effective at removing impurities and contaminants due to its porous structure, which absorbs toxins. Aim for a layer that is 1-2 inches thick.
Step 4: Add the Sand Layer
On top of the charcoal, add a layer of fine-grain sand. The sand helps filter out smaller particles and further purifies the water. This layer should also be about 1-2 inches thick.
Step 5: Add the Gravel Layer
Finally, add a layer of gravel or small pebbles. This top layer helps prevent the sand from getting disturbed when you pour water into the filter. A 1-2 inch layer should suffice.
Step 6: Test Your Filter
Pour a small amount of contaminated water through the filter. The water should flow from the top gravel layer through the sand, charcoal, and finally the cloth, dripping out from the neck of the bottle. The resulting water should be noticeably clearer.
The Science Behind the Filter
Understanding why and how your filter works can help you optimize it for different scenarios.
How Sand Filters Water
Sand is effective at trapping particulate matter. As water passes through the fine grains, particles get stuck between the grains and are physically removed from the water.
The Role of Charcoal
Charcoal is known for its adsorption properties. It attracts and holds particles, molecules, and contaminants on its surface. This makes activated charcoal particularly effective at removing organic compounds, chlorine, and even some toxins.
The Importance of Gravel
Gravel acts as a first line of defense. It captures larger debris and prevents the sand from being displaced. This helps maintain the integrity of the sand layer and ensures consistent filtration.

Maintaining Your Water Filter
Even the best-made water filters need maintenance. Regularly check each layer and replace them as needed to ensure your filter continues to perform effectively.
How Often to Change the Materials
How often you’ll need to change the materials depends on how frequently you use the filter and the turbidity of the water. Here’s a general guideline:
- Cloth/coffee filter: Replace every few uses or when visibly dirty.
- Charcoal: Replace every 2-3 weeks or more frequently if filtering very dirty water.
- Sand: Replace every month or when performance drops.
- Gravel: Wash regularly and replace if it becomes too dirty.
Cleaning the Filter
Occasionally disassemble the filter, remove each layer, and thoroughly rinse it. This helps prolong the life of your filter and keeps it working efficiently.
Tips for Optimal Performance
Here are some additional tips to ensure your natural water filter works to its fullest potential:
- Pre-filtering: Use a bandana, cloth, or any fabric to pre-filter water before it goes into your main filter. This helps reduce the load on your main filter.
- Multiple Layers: Adding additional layers of sand and charcoal can enhance the filtration process.
- Storage: Keep the filter components dry when not in use to prevent mold and bacterial growth.
Emergency vs. Day-to-Day Use
Whether you’re using your filter in a survival situation or on a casual camping trip, it’s important to understand the different contexts in which you might deploy this filter.
Emergency Situations
In an emergency, you may not have the luxury of ideal materials. Focus on improvisation. Burn wood to create charcoal, use river sand and gravel, and find any cloth available for the initial layer. Remember, any filtration is better than none.
Recreational Use
For camping or hiking, you can prepare better-quality materials in advance. Pack activated charcoal, fine-grain sand, and clean gravel. Having a well-constructed, high-quality filter could save you from unexpected water shortages.
Additional Considerations
While a sand and charcoal filter is effective, it may not remove all contaminants, especially certain bacteria and viruses. Always consider additional water purification methods if possible.
Boiling Water
After filtering, the safest way to ensure water is clean is by boiling it. Bring water to a rolling boil for at least one minute to kill bacteria, viruses, and protozoa.
Chemical Treatments
Using water purification tablets or drops can help eliminate residual pathogens. Always follow the instructions provided by the manufacturer.
Conclusion
Making a natural water filter with sand and charcoal is not just an exercise in DIY ingenuity; it’s a potentially life-saving skill. By understanding the materials needed, the assembly process, and the maintenance required, you can ensure that you have access to cleaner water anytime, anywhere.
With this guide, you are now equipped to build your own natural water filter. Practice the process, familiarize yourself with how each component works, and be prepared. The next time you find yourself in need of clean water, you’ll know exactly what to do. Stay safe and hydrated!