In “How To Make A Survival Spear,” you’ll discover essential techniques and tips for crafting this lifesaving tool. Whether you’re an outdoor enthusiast or someone who wants to be prepared for the unexpected, this guide will walk you through the process step-by-step. You’ll learn about selecting the right wood, sharpening the blade, and securing it properly. By the end, you’ll have the knowledge and confidence to create your own survival spear, making you feel more self-reliant and ready for any adventure that comes your way.
How To Make A Survival Spear

A Friendly Guide for Outdoor Enthusiasts
Have you ever found yourself in the wilderness wondering, “How would I protect myself or hunt for food if I didn’t have modern tools?” Knowing how to make a survival spear can be a game-changer. Not only does it give you a sense of empowerment, but it’s also an essential skill for anyone serious about outdoor adventures, bushcraft, or survival situations. Today, we’ll walk you through the step-by-step process of making a survival spear. So grab your gear, and let’s get started!
Why Would You Need a Survival Spear?
Before we dive into the how-to, it’s important to understand why you might need a survival spear. This isn’t just a cool project; it’s a multi-functional tool that can serve various purposes in a survival scenario.
Hunting and Self-Defense
A spear can be used for hunting small and medium-sized game, allowing you to maintain a safe distance from potentially dangerous animals. It’s also an effective self-defense weapon if you encounter aggressive wildlife or need to protect yourself from human threats.
Fishing
Spears are incredibly useful for fishing, especially if you construct a multi-pronged spear or trident. This allows you to catch fish in shallow waters effectively.
General Utility
In addition to hunting and defense, a spear can also be useful for tasks like moving objects, inspecting distant or unsafe areas, and even as a walking stick in rough terrain.
Knowing these purposes, we’ll now discuss what you’ll need to start making your own survival spear.
Materials You Will Need
To make a functional and durable survival spear, you’ll need the right materials. Some of these can be found in nature, while others might require bringing along a few simple tools.
Natural Materials:
-
Wood:
- A straight and sturdy branch around 6-8 feet long.
- Ideal types of wood: Hardwood trees like oak, hickory, or ash.
-
Stone:
- Sharp stones or flints for the spearhead.
- Optional but highly recommended for a reinforced tip.
Additional Materials:
-
Knife or Cutting Tool:
- Any sturdy survival knife or multi-tool with a good blade.
-
Cordage:
- Paracord or any strong natural fibers you can find in the wilderness.
Optional Materials:
-
Adhesive:
- Pine sap or any natural adhesive can be used to strengthen the bindings.
-
Feathers:
- For added stability when throwing the spear.
Now that you have gathered all your materials, it’s time to start crafting your survival spear.
Step-by-Step Guide to Making a Survival Spear
Creating a survival spear involves several key steps, from finding the right materials to assembling and refining your tool.
Step 1: Selecting the Shaft
Selecting the right shaft is crucial. Your choice of wood should be straight, sturdy, and free from significant defects like large knots or cracks. A straight branch makes for better handling and accuracy.
Step-by-Step Process:
-
Find Your Wood:
- Locate a straight branch around 6-8 feet long and 1-2 inches in diameter.
-
Inspect and Cut:
- Ensure there are no significant cracks or weaknesses.
- Use your knife to cut the branch at the base.
-
Strip the Bark:
- Remove the bark if necessary. This can be done either before or after you finish the spearhead. Stripping the bark reduces weight and makes it easier to handle.
Table: Ideal Woods for Spear Shaft
| Wood Type | Characteristics |
|---|---|
| Oak | Strong, dense, and durable |
| Hickory | Tough and shock-resistant |
| Ash | Lightweight yet strong |
| Maple | Great shock absorption |
| Locust | Highly durable and rot-resistant |
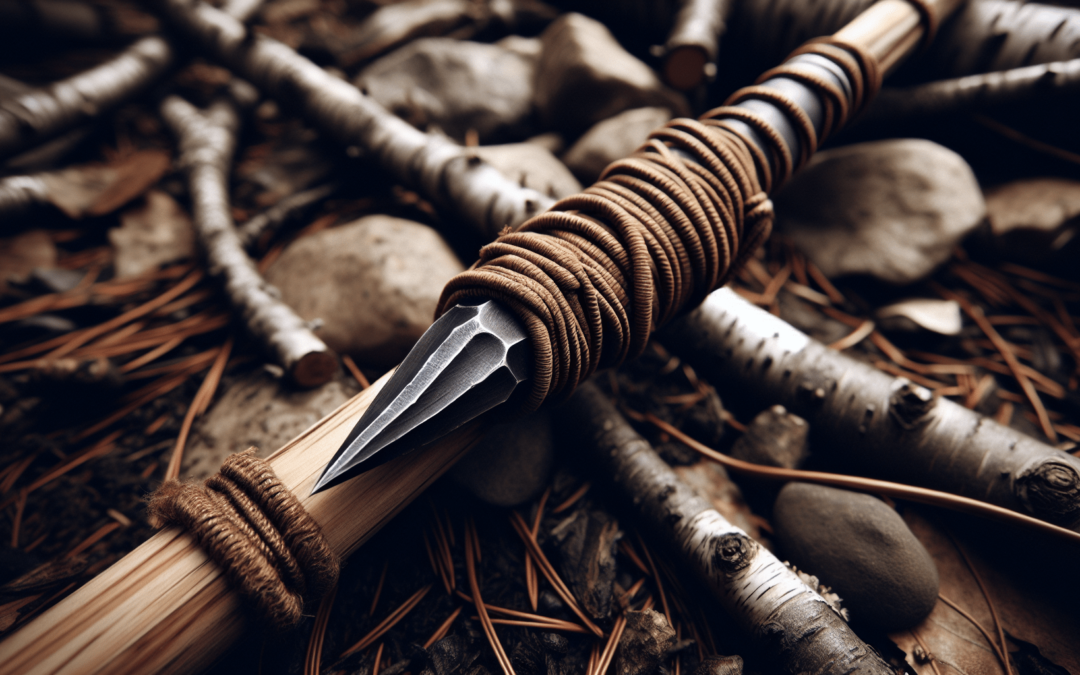
Step 2: Shaping the Spearhead
This is perhaps the most critical part of the process. A well-crafted spearhead can be the difference between an effective tool and a useless stick. You have a couple of options for the spearhead: you can use a sharpened wooden tip or make a stone spearhead for a more durable solution.
Wooden Spearhead
-
Sharpening the Tip:
- Use your knife to carve a sharp point at one end of the shaft. The sharper and more focused the tip, the better its penetration power.
-
Hardening the Wood:
- To harden the wooden tip, heat it over a fire without burning it. This process, known as fire-hardening, increases the tip’s durability.
Stone Spearhead
-
Find a Sharp Stone:
- Locate a flat, sharp stone or flint.
-
Notch the Shaft:
- Carve a notch at the end of the shaft to fit the stone securely.
-
Attach the Stone:
- Place the stone in the notch and bind it tightly using cordage. You can also use natural adhesive for added strength.
Table: Spearhead Comparison
| Spearhead Type | Advantages | Disadvantages |
|---|---|---|
| Wooden | Easy to make, lightweight | Less durable, needs frequent resharpening |
| Stone | Highly durable, high penetration power | Harder to attach, heavier |
Step 3: Securing the Spearhead
Ensuring that your spearhead stays securely attached is crucial for the longevity and effectiveness of your spear. Neglected bindings can result in a loose or detached spearhead, making your tool ineffective.
Binding Process:
-
Prepare Your Cordage:
- If you’re using paracord, cut a sufficient length. If using natural fibers, twist them into a strong cord.
-
Position the Spearhead:
- Ensure your stone or wooden spearhead is securely in place.
-
Wrap Tightly:
- Wrap the cordage tightly around the spearhead and shaft. Ensure there are no loose ends.
-
Seal the Binding:
- You can use natural adhesive like pine sap for extra strength.
Step 4: Refining and Balancing the Spear
A well-balanced spear is easier to throw and control. Proper refinement can also make your spear more durable and effective.
Refinement Steps:
-
Smooth the Shaft:
- Sand down any rough spots to prevent splinters and improve grip.
-
Balance Test:
- Hold the spear at its midpoint to check for balance. Adjust as needed by trimming or adding weight.
-
Optional Additions:
- Feathers or other fletching materials can be added to the rear of the spear for better flight stability if you intend to throw it.
Step 5: Testing and Maintenance
Once your spear is crafted, it’s critical to test and maintain it. Regular checks and maintenance will ensure your spear remains functional and reliable.
Testing:
-
Initial Test:
- Practice using your spear in a controlled environment to get a feel for its balance and strength.
-
Real-World Test:
- Attempt hunting small game or practice target throws to ensure it performs as expected.
Maintenance Tips:
-
Regular Inspections:
- Check the spearhead and bindings regularly for signs of wear and tear.
-
Resharpening:
- Sharpen the spearhead as needed to maintain its effectiveness.
-
Rebinding:
- Replace or tighten the bindings if they become loose.

Tips and Tricks for a Better Spear
While the basic steps will get you a functioning spear, there are some additional tips and tricks to make your survival spear even better. These small adjustments can make a big difference in the spear’s performance and usability.
Using a Multi-Pronged Spear
A single-pointed spear is great, but consider creating a multi-pronged spear for fishing. This type enhances your chances of catching small game and fish by increasing the hit area.
Table: Single-Point vs. Multi-Pronged Spear
| Attribute | Single-Point Spear | Multi-Pronged Spear |
|---|---|---|
| Precision | High | Moderate |
| Catch Rate | Lower | Higher (especially for fish) |
| Complexity | Simple | Requires more skill and material |
| Ideal Use | Hunting small to medium game | Fishing |
Creating a Fire-Hardened Spear
Fire-hardening your wooden spear tip makes it much more durable. Here’s a quick guide on how to do it properly:
-
Preparation:
- Rub the spear tip with sand or stone to create a smoother surface.
-
Heating:
- Hold the spear tip over a fire. Rotate it constantly to ensure even heating. Don’t let it catch fire—you’re aiming to dry and harden the wood, not burn it.
-
Cooling:
- Allow the tip to cool slowly. This process will increase its hardness and durability.
Enhancing Grip
A slippery spear can be dangerous and inefficient. Here are a few methods to improve the grip on your spear:
-
Wrappings:
- Use cordage to create a wrapped grip. This provides better handling and control.
-
Roughing Up the Surface:
- Roughen the section of the spear you’ll be holding with your knife to create texture. Sanding or scraping the surface can add friction and prevent slipping.
Adding Feathers for Throwing Accuracy
If you plan to use the spear for throwing, fletching (adding feathers) can stabilize its flight.
-
Select Feathers:
- Choose sturdy, straight feathers.
-
Attach Feathers:
- Bind the feathers to the rear end of the spear using cordage or natural glue. Position them carefully for balance.
Legal Considerations and Safety Tips
Before using your spear, it’s essential to be aware of any legal implications. Carrying or using a spear in certain areas might be restricted or considered illegal.
Legal Considerations
-
Check Local Laws:
- Regulations on hunting and carrying weapons can vary widely. Check with local authorities before using your spear.
-
Permits:
- You might need a permit for hunting. Ensure you’re compliant with local wildlife conservation laws.
Safety Tips
Using a spear, especially for hunting or self-defense, requires caution and respect for wildlife and others around you.
-
Practice Makes Perfect:
- Familiarize yourself with spear handling in a controlled environment before heading into the wild.
-
Be Mindful of Your Surroundings:
- Always be aware of your surroundings to avoid accidents.
-
Emergency Plan:
- Keep a first aid kit and have an emergency plan in place.
-
Warning to Others:
- Let others know your intentions, especially in a group setting, to avoid misunderstandings.
Conclusion
Congratulations! You now have a comprehensive guide on how to make a survival spear. This ancient skill can prove invaluable whether you’re an avid hunter, angler, or outdoor survivalist. Not only is it a practical tool, but crafting your own spear also connects you with age-old traditions of survival and self-reliance.
Remember, the key steps include selecting the right materials, shaping and attaching the spearhead, securing it properly, and ensuring that your spear is balanced and maintained. Knowing these steps will not only help you create a functional spear but also prepare you for other bushcraft tasks and survival scenarios.
Now that you have this knowledge, why not head outdoors and try making your own survival spear? Happy crafting, and stay safe out there!